Do you trust your calculations?
This book review is about The Los Alamos Primer, the first lectures on how to build an atomic bomb, by Robert Serber. The review focuses on the basic calculations and physics knowledge of the Manhattan Project scientists. Since the Primer is a collection of 1943 lecture notes combined with Serber’s hindsight commentary, it corrects some of the original calculations and measurements by comparing them with modern values. This makes it fascinating to see how close—or off—the physicists were at the time. For anyone interested in the topic, I highly recommend reading both the Primer and The Making of the Atomic Bomb by Richard Rhodes, one of my all-time favorite books.
The history behind the Primer is remarkable: these lectures were given to every physicist arriving at Los Alamos in the spring of 1943. It is fascinating to read the material that guided the people responsible for building the first atomic bomb. My main goal in this post is to keep the essential physics concepts simple and accessible, while sometimes diving deep into the rough calculations to capture the knowledge and uncertainty the scientists experienced back then.
Building a Practical Military Weapon
First and foremost, it’s important to note that the Manhattan Project had a clear goal: building a practical military weapon for massive destruction. Although this sounds extreme, the primary motivation was to beat Nazi Germany and minimize overall damage. The original text states:
The object of the project is to produce a practical military weapon in the form of a bomb in which the energy is released by a fast neutron chain reaction in one or more of the materials known to show nuclear fission.
In the lectures, the word bomb was replaced by gadget, and by “practical” they meant that it was light and small enough to be transported by an airplane—not a heavy object weighing several tons like a nuclear reactor.
The primary process exploited in the construction of the first nuclear weapons was the release of energy from nuclear fission (later, hydrogen bombs based on nuclear fusion were developed). In the early 1930s, Enrico Fermi and his colleagues bombarded various nuclei with neutrons, operating under the assumption that these interactions would transmute the nuclei into heavier elements. It was only later, in the winter of 1938, that Otto Hahn, Fritz Strassmann, Lise Meitner, and Otto Frisch analyzed the reaction products of neutron bombardment on uranium and discovered that the process resulted in the splitting of the nucleus rather than its transmutation. Their breakthrough demonstrated that, among naturally occurring elements, only uranium (specifically the fissile isotope $\mathrm{U}^{235}_{92}$) is readily splittable by neutron-induced reactions. Although early nuclear devices eventually employed both uranium and synthetic plutonium, it was uranium’s unique ability to undergo fission that provided the essential foundation for the atomic bomb.
Back of the Envelope Energy Considerations
In order to provide some everyday energy comparisons, here is an energy unit conversion table for reference (all have the same dimension of $\frac{M L^2}{T^2}$):
| J (Joule) | kWh | cal (Calorie) | eV (Electronvolt) | erg | kt (kiloton) TNT |
|---|---|---|---|---|---|
| $1 \text{ J}$ | $3.6 \times 10^6 \text{ J}$ | $4.184 \text{ J}$ | $1.602 \times 10^{-19} \text{ J}$ | $10^{-7} \text{ J}$ | $4.184 \times 10^{12} \text{ J}$ |
Fission of a heavy nucleus like uranium is remarkable because it releases an enormous amount of energy. In a typical fission event, the energy released by splitting one uranium nucleus is about $$ 200 \text{ MeV} \approx 3.2 \times 10^{-11} \text{ J}. $$ In contrast, a typical chemical reaction (such as combustion) releases on the order of $$ 1 \text{ eV} \approx 1.6 \times 10^{-19} \text{ J} $$ per bond. Thus, nuclear fission is roughly $10^8$ times more energetic per event than chemical reactions. Since the energy output of a detonation is critical for weapon design, it was immediately evident to physicists that a weapon based on fission would possess enormous destructive power.
The energy released from splitting a uranium nucleus can be understood through binding energy calculations that consider, among other contributions, the electrostatic (Coulomb) repulsion between protons. Although the energy difference is often expressed via Einstein’s mass–energy equivalence, $E = mc^2,$ this relation serves only to convert the binding energy difference into an equivalent mass defect; it does not imply that relativistic effects play a role in the fission process.
Consider a $\mathrm{U}^{238}$ nucleus with $Z=92$, $N=146$ and $A=238$. Its Coulomb energy can be estimated using $$ E = \frac{1}{4\pi\epsilon_0}\frac{3}{5}\frac{Q^2}{R} \quad \text{with} \quad Q = Z e. $$ Plugging in the following values $$ \frac{e^2}{4\pi\epsilon_0} \approx 1.44 \text{ MeV}\cdot\text{fm} \quad \text{and} \quad R \approx 7.4 \text{ fm}, $$ gives us $$ E_{\text{U}} \approx \frac{3}{5}\frac{1.44 \times (92)^2}{7.4}\text{ MeV}. $$
Since $92^2 \approx 100^2 = 10^4$ and $1.44 \approx 1.5$ and $7.4 \approx 8$, this gives $$ E_{\text{U}} \approx \frac{3}{5}\frac{1.4 \times 10^4}{8} \text{ MeV} \approx 1050 \text{ MeV}. $$
Now, assume a symmetric fission into two fragments, each with $Z\approx46$ and $A\approx119$. The radius for a fragment would go down with a factor of $ \frac{1}{\sqrt[3]{2}} $, which gives us $$ R_{\text{frag}} \approx 7.4 \times \frac{1}{\sqrt[3]{2}} \approx 5.9 \text{ fm}. $$
The Coulomb energy of one fragment (assuming $ 46 \approx 50 $) is then $$ E_{\text{frag}} \approx \frac{3}{5}\frac{1.4 \times 50^2}{6} \approx 350 \text{ MeV}. $$
The net change in Coulomb energy due to fission is therefore $$ \Delta E \approx E_{\text{U}} - 2 \times E_{\text{frag}} \approx 1050 - 700 \approx 350 \text{ MeV}. $$
The fission process releases roughly $\Delta E \approx 350 \text{ MeV}$ per event, as the Coulomb energy of the original nucleus is reduced by splitting it into two smaller fragments.
Energy Yield from Partial Fission
In practical applications (both in bombs and reactors) it is very difficult to achieve complete fission of all available fissile material. For instance, suppose that only $1$ % of the uranium in a sample undergoes fission. Consider $1$g of uranium-235. The number of atoms in $1$g is $$ N \approx \frac{N_A}{235} \approx \frac{6.022 \times 10^{23}}{235} \approx 2.5 \times 10^{21} \text{ atoms}. $$ If only $1$ % of these atoms fission, then the number of fission events is $$ N_{\text{fission}} \approx 0.01 \times 2.5 \times 10^{21} \approx 2.5 \times 10^{19}. $$ With each fission releasing approximately $ 5 \times 10^{-11} \text{ J},$ the total energy released is $$ E_{\text{total}} \approx 2.5 \times 10^{19} \times 5 \times 10^{-11}\text{ J} \approx 12 \times 10^{8}\text{ J}. $$ Converting this to kilowatt-hours, $$ \frac{12 \times 10^{8}\text{ J}}{3.6 \times 10^{6}\text{ J}/ \text{ kWh}} \approx 300 \text{ kWh}. $$
For comparison, if one could fission $100$% of that $1$g of uranium, the energy released would be roughly $ 30000 \text{ kWh},$ which is about $10$ times the average annual household electricity consumption in Austria (typically around $3500 \text{ kWh}$ per year). This stark contrast illustrates the tremendous energy density of nuclear fuel—even a tiny mass can, in principle, release energy comparable to that used by an entire household over a year, provided that complete fission were achieved.
Early Nuclear Devices: A Quick Comparison
Below is a summary table of three historic early atomic bombs in the Trinity Test, Hiroshima and Nagasaki. While exact numbers vary by source, the values here illustrate the relative mass of fissile material, efficiency (the fraction actually fissioned), and the corresponding difference between maximum theoretical yield (if all fissile material were consumed) and actual yield.
| Device | Material | Mass (kg) | Efficiency (%) | Theoretical Yield (kt TNT) | Actual Yield (kt TNT) |
|---|---|---|---|---|---|
| Trinity | Pu-239 | ~6.2 | ~17 | ~105 | ~21 |
| Little Boy | U-235 | ~64 | ~1.5 | ~1000 | ~15 |
| Fat Man | Pu-239 | ~6.2 | ~17 | ~105 | ~21 |
These estimates highlight both the tremendous energy potential of nuclear fission and the engineering challenges of achieving high fission efficiencies in practice.
Chain Reaction
Splitting the atom is only half of the reason why bombarding a nucleus with neutrons can yield so much energy. When a nucleus is split by a neutron, it not only breaks into two or more fragments but also emits additional neutrons, which may strike other nuclei. The key question is: How many neutrons are released on average by each fission event? Only if this average number is at least $1$ does the process sustain or even accelerate itself, leading to a Chain Reaction. By “chain reaction,” we mean exponential growth in the number of fissioned atoms. For instance, if two neutrons are produced on average per fission, the sequence of split atoms goes 1, 2, 4, 8, 16, … and so on, describable by
$$ N(t) = N_0 \times k_{eff}^t, $$
where $N(t)$ is the number of atoms split at time $t$ and $k_{eff}$ is the effective reproduction factor. It has to be higher than 1, preferable around 2 in order to sustain a chain reaction in an atomic bomb.
Because the average number of neutrons emitted per fission is so crucial, it is termed the Neutron Number and denoted by the symbol $\nu$. This number depends strongly on both the energy of the incoming neutron and the material itself. Another important material property is the Fission Cross Section. Each nucleus has a geometrical cross section $\sigma$ reflecting its size. The fraction of collisions that actually induce fission times $\sigma$ gives the fission cross section, $\sigma_f$. If a neutron does not induce fission, it can be emitted again with either lower energy (inelastic scattering) or roughly the same energy (elastic scattering). The latter process is governed by quantum mechanics. At very low neutron energies, quantum effects (stemming from the Heisenberg uncertainty principle) can become so pronounced that the fission cross section appears larger than the purely geometrical one. However, in the scenarios of interest here, the neutrons remain too energetic for such resonance effects to dominate as we will see in a minute.
Elements
Besides the neutron number $\nu$ and the fission cross section $\sigma_f$, it is also interesting for a material how much energy an incoming neutron must have to induce fission and how much energy the emitted neutrons from a fission process have.
The only naturally occurring element used to build the first atomic bombs was uranium in its natural form $\text{U}^{238}$. Only one 140th of it is $\text{U}^{235}$, the much more fissile isotope. The third element used was $\text{Pu}^{239}$, which can only be synthetically generated as a byproduct of a slow nuclear chain reaction. As we will see in the graphics and table below, the latter two elements have much better fission properties than the naturally occurring $\text{U}^{238}$. From this stemmed the biggest challenge on the route to build the first atomic bomb: build the industry necessary to enrich $\text{U}^{235}$ (as was done in Oak Ridge through diffusion and electromagnetic separation techniques) or synthesize $\text{Pu}^{239}$ in atomic reactors (as was done in Hanford). Both processes were very difficult to invent and required major financial and workforce investments. This is often an overlooked point from the Second World War: only the United States was economically able to build up this industry from scratch; all other nations had war fields on their mainland.
Now we will look into two important graphs. The first one shows the energy of incoming neutrons versus the fission cross section for the three materials at hand. The message is that $\text{U}^{235}$ and $\text{Pu}^{239}$ are much more fissile than the naturally occurring $\text{U}^{238}$. The second graphic shows the distribution of the energy of emitted neutrons from a fission process. These distributions for the three materials look almost the same.
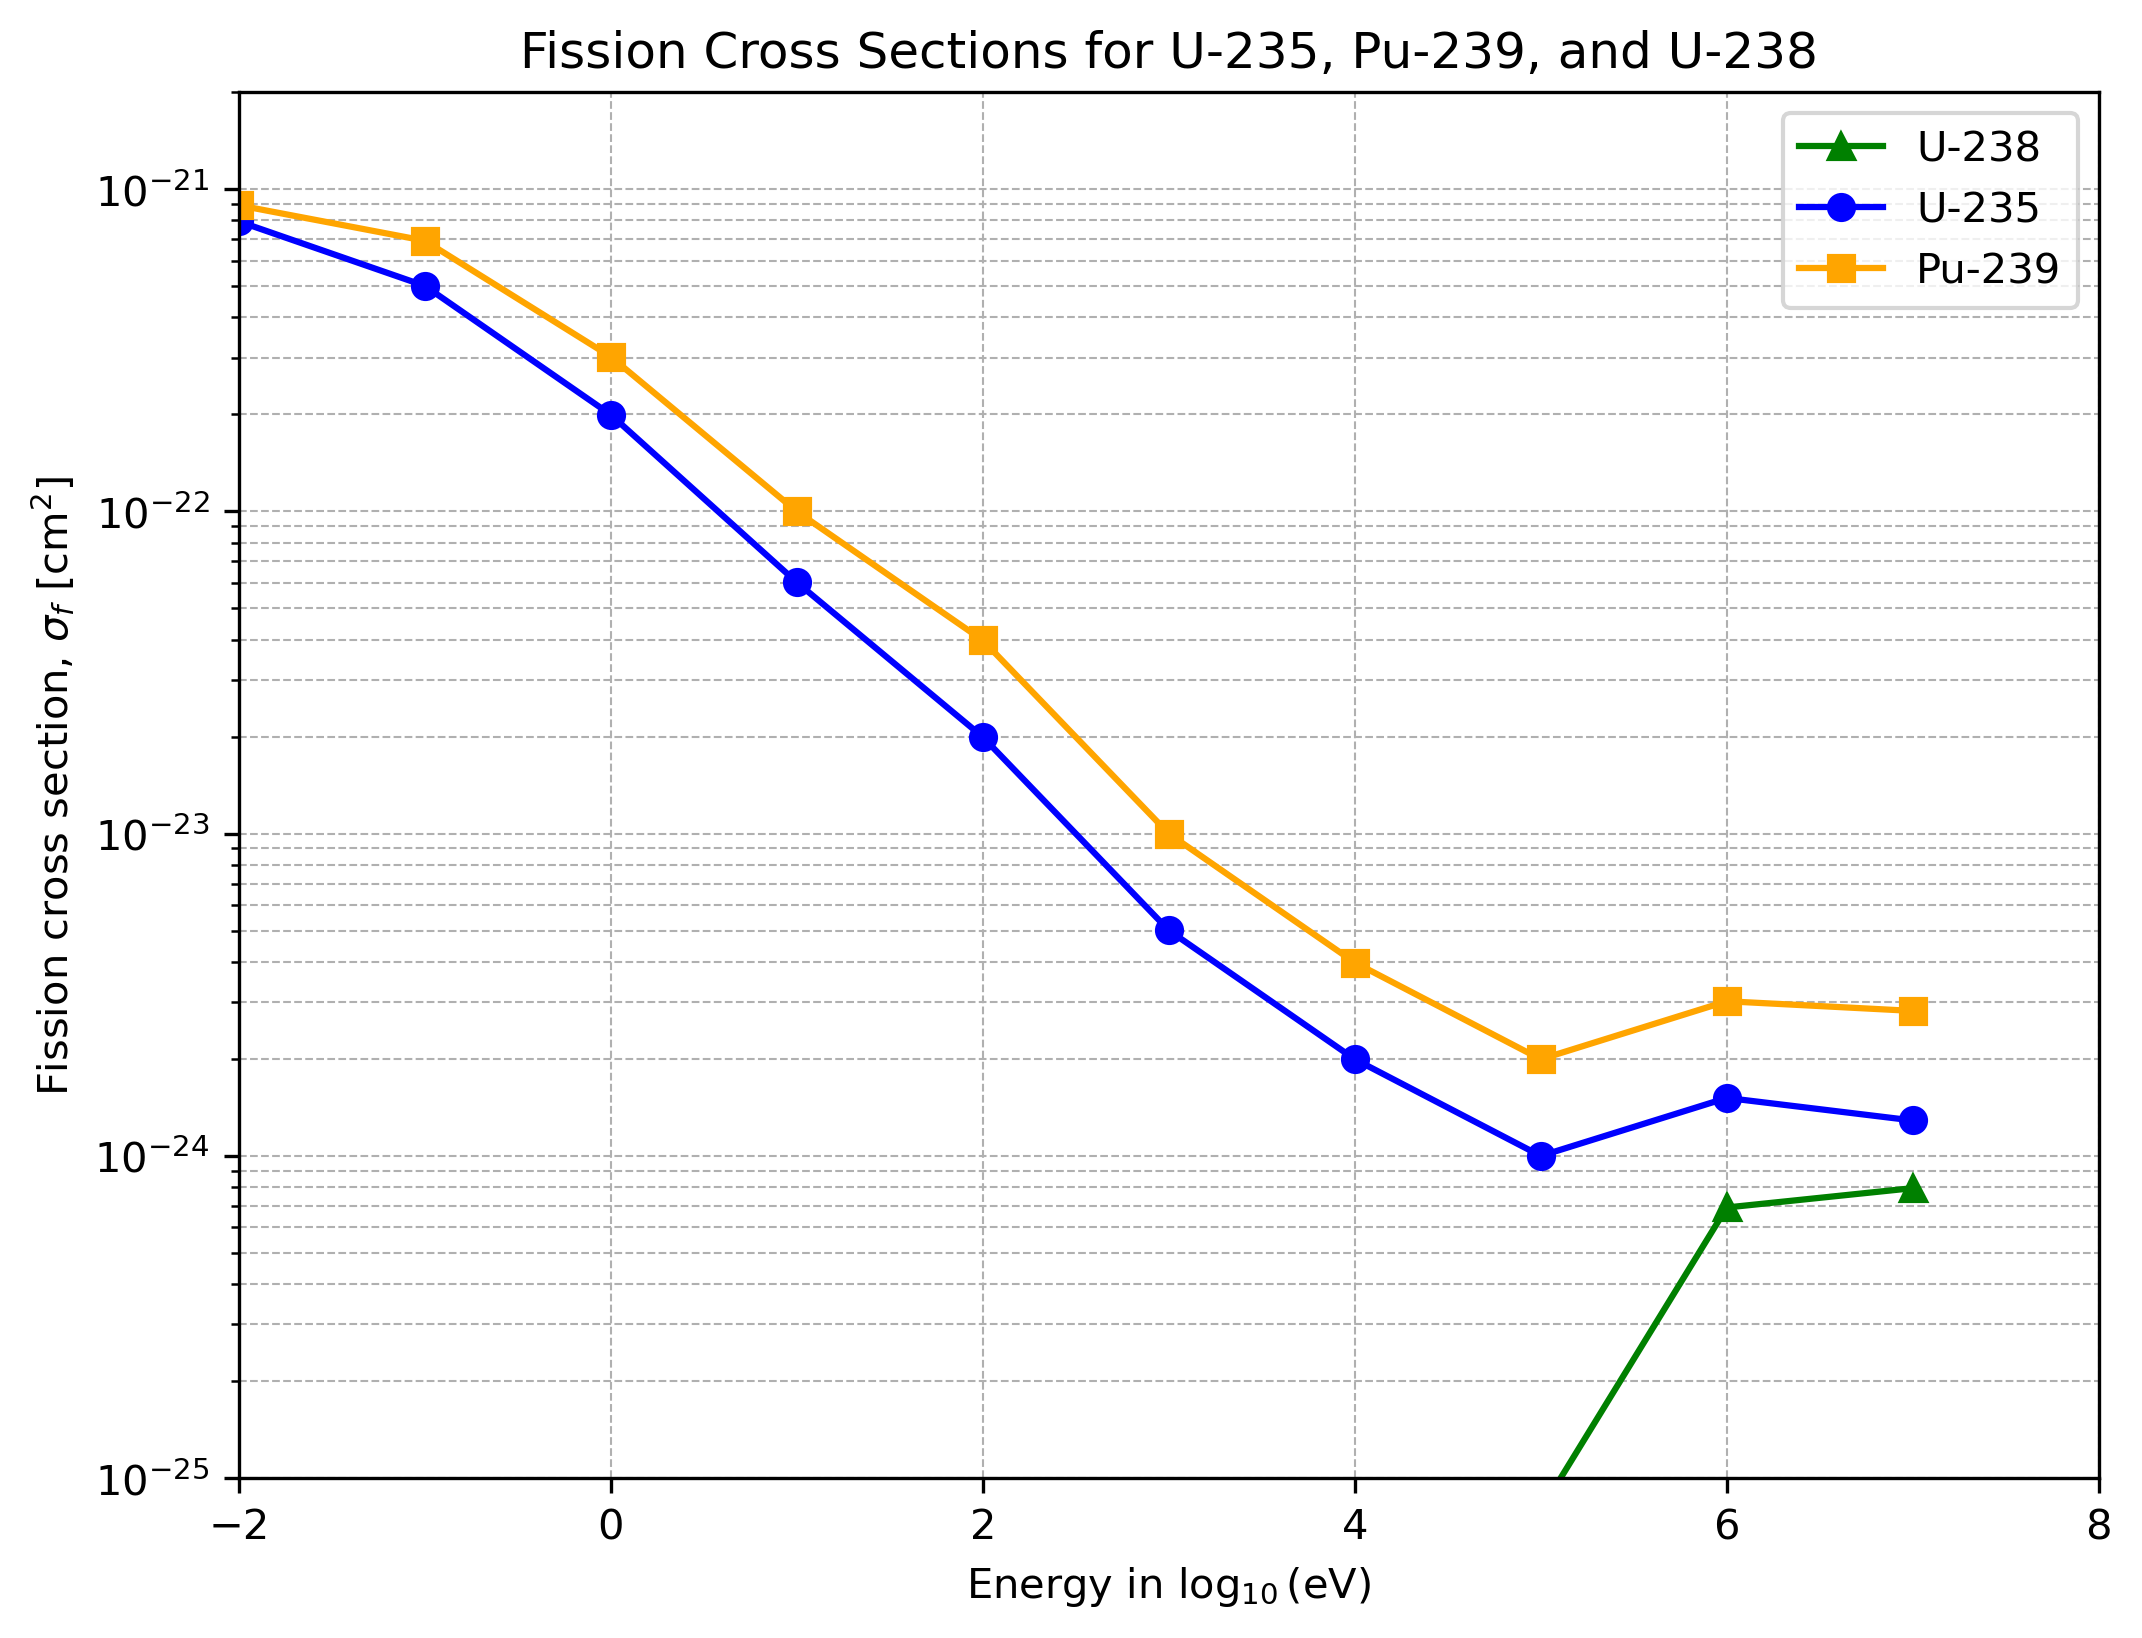
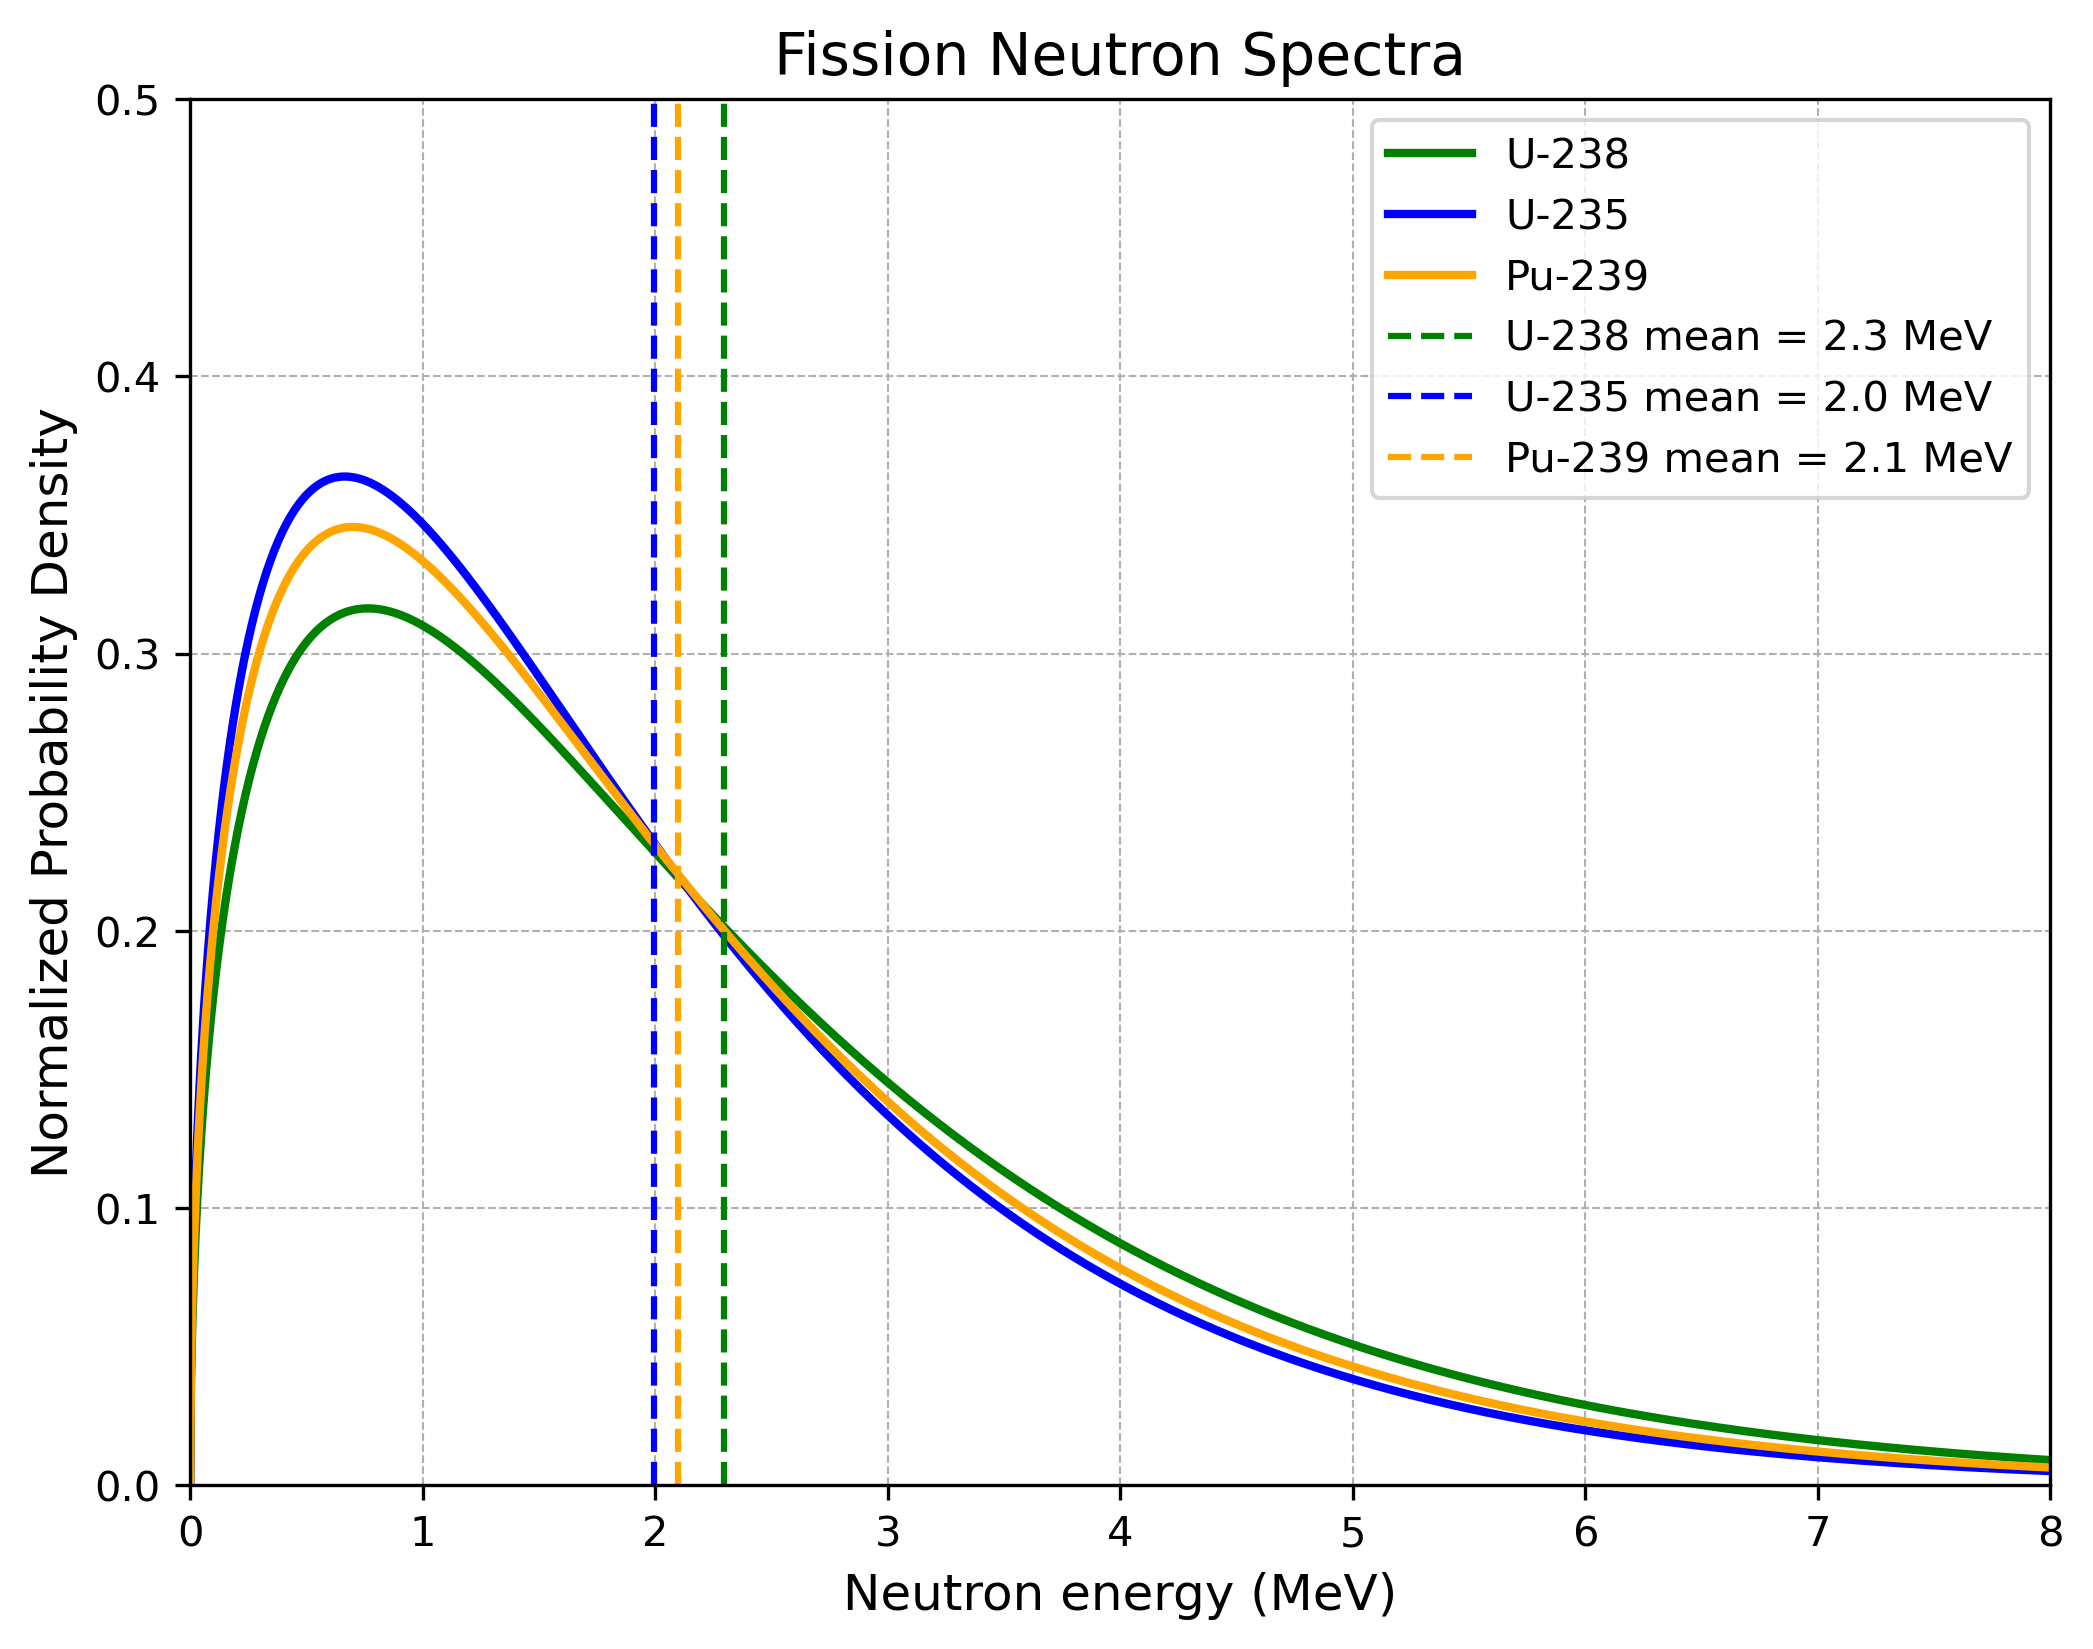
The key story from these two plots would suggest harnessing slow neutron fission in order to exploit large fission cross sections and use all the slow emitted neutrons from the occurring fission processes. Although these facts are used in nuclear reactors, it is not possible to exploit them in an atomic bomb. Why this is the case will be clarified in the coming section.
What about the neutron numbers? Below in the table you will see estimates used back then and the actual values measured nowadays for neutron numbers and fission cross sections (these are values for energetic incoming neutrons from the graph above). Also shown is the quantity $(\nu - 1) \times \sigma_f$, since neutron number and fission cross section will always arise in this combination in the upcoming calculations about critical masses. It is fascinating that the estimates of the individual values were quite off; however, the combined term was very close to the actual value. (The fission cross sections are given in $10^{-24} \text{ cm}^2$.)
| Isotope |
$\sigma_f$ (early estimate) |
$\sigma_f$ (actual) |
$\nu$ (early estimate) |
$\nu$ (actual) |
$(\nu-1)\,\sigma_f$ (early estimate) |
$(\nu-1)\,\sigma_f$ (actual) |
|---|---|---|---|---|---|---|
| U‑235 | 1.5 | 1.22 | 2.20 | 2.52 | 1.80 | 1.85 |
| Pu‑239 | 3.0 | 1.73 | 2.20 | 2.95 | 3.60 | 3.40 |
Slow vs. Fast Fission
Now we have to clarify why slow neutron fission cannot be used. It would indeed be very nice to exploit the larger fission cross section that arises from quantum effects when slow neutrons split nuclei (as the graphics from above showed for $\text{U}^{235}$ and $\text{Pu}^{239}$). Slow neutron fission is used in nuclear reactors. The key difference between a bomb and a reactor lies in the effective neutron reproduction factor: in a reactor it is controlled to be around $1$, while in an atomic bomb it is at or higher than $2$. In order to keep the reproduction factor at about $1$, the emitted neutrons have to be absorbed by moderating materials and slowed down (primarily by elastic scattering). The low reproduction number also ensures that the energy released remains at a controllable level and the reactor does not overheat.
If this factor is high, massive amounts of energy are released in a small volume, causing the material to expand very quickly. A quick calculation shows why this is the case. If we assume that $1$% of the energy from splitting one uranium atom (mass $m=3.88 \times 10^{-25}\text{ kg}$) converts into expansion speed using $E=\frac{1}{2} m v^2$ , and that each atom releases $E = 350\text{ MeV} \approx 5 \times 10^{-11}\text{ J}$, then:
$$ 0.01 \times 5 \times 10^{-11} = 3.88 \times 10^{-25} \times v^2 \Longrightarrow v \approx 1.1 \times 10^6 \tfrac{\text{m}}{\text{s}}.$$
At such speeds, the density of the bomb material drops rapidly and the system becomes subcritical, stopping the chain reaction in about $10^{-8}\text{ sec}$. This is why an atomic bomb cannot rely on slow-neutron fission—despite its higher cross sections—there is simply no time or mechanism for neutrons to be moderated and slowed down, and the rapidly expanding bomb material ensures that fast fission remains the dominating process.
Critical Mass
In order to calculate a reasonable estimate for the critical mass of a specific geometry and material, the scientists in Los Alamos first employed standard diffusion theory—with later refinements—to obtain an approximate result. Although the simple diffusion theory from statistical mechanics does not apply exactly (since the mean free paths of neutrons often exceed the characteristic dimensions of the system), it is sufficient to yield a rough estimate for the critical mass. We have previously estimated that the time between fission events is on the order of $ \tau \approx 10^{-8} \text{ s},$ and that the average number of neutrons produced per fission, $\nu$, is between $2$ and $3$. If $N(t)$ denotes the number of neutrons at time $t$, diffusion theory gives us the balance equation $$ \dot{N} + \nabla \cdot \mathbf{j} = \frac{\nu - 1}{\tau} N,$$ where $\dot{N}$ is the time derivative of $N$, and $\mathbf{j}$ is the diffusion current of neutrons through the boundary of the material (which depends on the geometry). In simple diffusion theory, the current $\mathbf{j}$ is assumed to be proportional to the gradient of $N$: $$ \mathbf{j} = -D \nabla N,$$ where $D$ is the diffusion constant, which depends on the neutron velocity (as calculated earlier) and the cross sections of the material. Substituting this expression into the balance equation simplifies it to $$ \dot{N} = D \nabla^2 N + \frac{\nu - 1}{\tau} N.$$ It is important to note that $\dot{N}$ represents a time derivative, while the Laplacian operator $\nabla^2$ (arising from the divergence of the gradient) involves spatial derivatives.
In this equation we can separate the spatial and time-dependent parts of $N$ by writing $$N(t, x, y, z) = N_1(x, y, z) \exp\left(\frac{\nu’ t}{\tau}\right), $$ where $\nu’$ is the effective neutron number—that is, the fraction of neutrons produced in fission that actually cause further fission. (In many treatments, one defines $ \nu’ = (\nu - 1) \frac{\sigma_f}{\sigma_t},$ so that only the excess neutrons which lead to further fission are counted.) In order to achieve a balance and determine the point at which the mass becomes critical, we seek a spatial function $N_1(x,y,z)$ that satisfies $$ \nabla^2 N_1 + \frac{-\nu’ + \nu - 1}{D \tau} N_1 = 0.$$ Now this equation has to be solved for the geometry needed and with suitable boundary conditions. Here I will do a calculation for sphere and a comparison for a cube, in order to show the dependence on the geometry. Further we will go on with values from the sphere, since the bombs were also spherical. The boundary conditions will be simplified to $N=0$ at the radius of the sphere or the border of a cube with side length $a$.
For the sphere, using spherical coordinates the spatial solution is: $$ N_1(r)=\frac{\sin\Bigl(\frac{\pi r}{R}\Bigr)}{r}, $$ after plugging in into the equation above and simplifying we get to $\nu’ = (\nu - 1) + \frac{\pi^2 D \tau}{R^2}.$ Setting this equation equal to zero and solving for $R$ gives the critical radius: $$ R_{\rm crit}=\pi\sqrt{\frac{D\tau}{\nu-1}}.$$
Taking as an example $\text{U}^{235}$ with an average neutron yield $\nu\approx2.5$ (so that $\nu-1\approx1.5$) and assuming that for fast neutrons the diffusion constant and generation time combined give $ D\tau \approx 13.7\text{cm}^2,$ we find $$ R_{\rm crit}\approx \pi\sqrt{\frac{13.7}{1.5}} \approx 9.5\text{cm} \Longrightarrow M_{\rm crit}\approx 68\text{kg},$$ using the density $\rho\approx 19\text{g/cm}^3$ and the volume formula for a sphere.
For the cube the spatial solution is: $$ N_1(x,y,z)=\sin\Bigl(\frac{\pi x}{a}\Bigr)\sin\Bigl(\frac{\pi y}{a}\Bigr)\sin\Bigl(\frac{\pi z}{a}\Bigr),$$ which leads to (after plugging in and simplifying) $\nu’ = (\nu - 1) + \frac{3\pi^2D\tau}{a^2},$ so that solving for the critical side length $a_{\rm crit}$ gives $$ a_{\rm crit}=\pi\sqrt{\frac{3D\tau}{\nu-1}}.$$ Note that $a_{\rm crit}=\sqrt{3}R_{\rm crit}.$ Plugging in the same numerical values yields $$ a_{\rm crit}\approx\sqrt{3}\times 9.5\text{cm}\approx 16.5\text{cm} \Longrightarrow M_{\rm crit}^{\rm (cube)}\approx(16.5\text{cm})^3\times 19\text{g/cm}^3\approx 85\text{kg}.$$
It can be shown that, due to its less optimal geometry, the cube’s critical mass is higher than that of the sphere by a factor of $$ \frac{M_{\rm cube}}{M_{\rm sphere}}\approx\frac{3^{5/2}}{4\pi}\approx1.24.$$
These are very simplified calculations. In practice, the actual critical radius and mass for a bare sphere of $\text{U}^{235}$ are on the order of $$ R_{\rm crit}\approx10\text{cm}\quad \text{and}\quad M_{\rm crit}\approx60\text{–}70\text{kg}.$$ A more detailed analysis of the diffusion constant $D$ and the neutron generation time $\tau$ shows that the critical mass depends on material properties approximately as $$ M_{\rm crit}\propto \frac{1}{\rho^2}\frac{1}{\left[\sigma(\nu-1)\right]^{3/2}}.$$
Efficiency
A second major factor in the Manhattan Project was to maximize the efficiency of the bomb. Efficiency here is defined as the ratio between the actual energy released by fission and the theoretical maximum if all the fissile material were to fission. Our estimates before were an efficiency on the order of 1%. Now we have to clarify where this estimate comes from. The main reason is that the chain reaction ends when the bomb expands rapidly and the density falls below the critical level. Furthermore, we will see that larger bombs, which have multiples of the critical mass, have a higher efficiency.
Let $R_{cn}$ denote the critical radius at normal density $\rho_n$, and let $R_n$ be the initial (supercritical) radius of the bomb. Since mass scales as $M \propto R^3$, if the bomb contains twice the critical mass (i.e. $M_n/M_{cn} = 2$) then $$ \left(\frac{R_n}{R_{cn}}\right)^3 = 2,$$ so that $$ R_n = \sqrt[3]{2} R_{cn} \approx 1.26R_{cn}.$$ We define the excess factor as $$ \delta = \frac{R_n - R_{cn}}{R_{cn}},$$ so in this example $\delta \approx 0.26$ (we round this to $\delta \approx 0.25$ for simplicity).
A key assumption is that the chain reaction is effectively stopped at radius $R$ when the assembly expands by about half of this excess radius, i.e. $$ R - R_n = \frac{1}{2} \delta R_{cn}.$$ This assumption is not derived from first principles but serves as a practical cutoff point to indicate when the density has dropped enough to halt sustained fission.
Next, we consider a simple energy-balance argument. We assume that the outward expansion velocity is given by $$ v \approx \frac{\nu’}{\tau}(R - R_n),$$ where $\tau \approx 10^{-8}$ s is the neutron generation time and $\nu’$ is the effective neutron multiplication factor. The combined term $\frac{\nu’}{\tau}$ is the time constant in the growth process of the neutron number. In our model the energy released per gram of fissile material (for example, $\text{U}^{235}$) is approximately $E \approx 12 \times 10^{13} \text{J/kg}.$
We assume that a fraction $f$ of the fission energy $E$ (in J/kg) is converted into kinetic energy that drives the expansion. Only this energy will be released before the fission process stops. The kinetic energy per kilogram is given by $ \frac{1}{2}v^2,$ where the expansion velocity is assumed to be $v \approx \frac{\nu’}{\tau}(R - R_n).$ Here, $\tau \approx 10^{-8}$ s is the time between two fission events, and $\nu’ \approx \nu - 1 \approx 1.5$ is the effective neutron number. We also assume that the chain reaction ends when the bomb expands by the excess factor from above, i.e. when $R - R_n = \frac{1}{2} \delta R_{cn}$.
Then the expansion velocity becomes $$v \approx \frac{\nu - 1}{\tau}\left(\frac{1}{2} \delta R_{cn}\right).$$ Thus, the kinetic energy per kilogram is $$\frac{1}{2}v^2 \approx \frac{1}{2}\left[\frac{(\nu - 1) \delta R_{cn}}{2 \tau}\right]^2 = \frac{(\nu - 1)^2 \delta^2 R_{cn}^2}{8 \tau^2}.$$
Assuming that this kinetic energy represents the fraction $f$ of the available fission energy $E$, we set $$f \times E = \frac{(\nu - 1)^2 \delta^2 R_{cn}^2}{8 \tau^2}.$$ Solving for $f$ gives $$f = \frac{(\nu - 1)^2 R_{cn}^2}{8E \tau^2} \delta^2.$$
Now we plug in all values from above and use $R_{cn} \approx 0.09 \text{m}$. This gives us the following estimate: $$f \approx \frac{0.00123}{0.096} \approx 0.0128,$$ or about 1.3%. Within the uncertainties and simplifications of this model, this result is on the order of 1% efficiency.
Thus, even though a bomb with twice the critical mass starts out substantially supercritical, the rapid hydrodynamic expansion limits the time available for additional fission generations, so that only about 1% of the fissile material actually undergoes fission. We see that efficiency is an important topic and area where improvements could be made. Also, modern values are about 1–5%.
Tamper
Tamper is an additional layer of material placed around the enriched core. It serves two main purposes:
-
Neutron Reflection: The tamper reflects neutrons that would otherwise escape through the boundary back into the material. This improves the boundary conditions in the diffusion equation, thereby reducing the critical mass required to sustain a chain reaction. For example, a tamper layer about 2–3 cm thick, made of a high-density material like gold or $\text{U}^{238}$, can reduce the critical mass by roughly a factor of 4 compared to a bare core.
-
Inertial Delay: The tamper adds mass to the bomb, increasing its inertia. This extra mass slows down the expansion of the core during the explosion. Although this delay gives the chain reaction a bit more time to proceed, the overall impact on efficiency is limited. In the context of the Primer, even with the tamper the efficiency remains very low (not much bigger than the 1–2% from before), because the time scale for the chain reaction is extremely short (around $\tau \sim 10^{-8}$ s).
In summary, while the tamper can significantly reduce the critical mass by improving neutron retention, its effect on the overall efficiency of the explosion is relatively modest.
Bomb Design
The first main approach to actually build a bomb that creates a critical mass and releases a large amount of energy was the gun-type design. The key idea was to shoot two parts of subcritical material at each other using ordinary explosives, so they would combine into a critical assembly. The Little Boy bomb dropped on Hiroshima (using $\text{U}^{235}$) was such a design. In practice, the projectile section traveled at roughly $300 \text{ m/s}$, but even at this relatively high speed, much of the material fizzled, which meant partial and premature fission, resulting in a relatively low efficiency (as seen in the earlier table).
The second, much more difficult, yet ingenious, approach was the implosion-type design. The Trinity Test and the bomb thrown on Nagasaki, Fat Man was of such design. Since the critical mass depends on density (as indicated by the formula from the “Critical Mass” section), the idea was to ignite ordinary explosives around a subcritical sphere of $\text{Pu}^{239}$, thereby compressing it, increasing its density, and causing it to become critical. Additionally, these explosives served as tamper material to help confine the assembly and reduce the critical mass. This design posed a major engineering and physics challenge, as it involved calculating shock waves propagating through multiple materials and estimating the effectiveness of the explosive lenses. Without modern computers, carrying out these fluid dynamics calculations took significant time and the success of this approach was uncertain for a very long time.
Where Did All This Lead?
This last section is mainly about the destructive power and the harm caused by the bombs developed over the two years following these basic calculations. Everyone should form their own opinion on whether it was right to drop these bombs—causing immense suffering for a smaller number of people—in order to end the war instead of allowing a longer conflict that might have killed millions more. It was undoubtedly a tough decision to make.
Certainly, building an atomic bomb or a reactor requires extensive engineering and an entire industry to supply the raw materials. Still, it is enlightening to see that with relatively basic assumptions and Newtonian physics, the scientists were able to deduce the main principles and reach conclusions that guided the project. Furthermore, reading the Primer highlights the fundamental assumptions under which the researchers operated at the time.
The destruction caused by the first atomic bombs dropped on Hiroshima and Nagasaki on August 6th and 9th, 1945, had multiple facets. The most obvious, though not necessarily the most dangerous, is the radioactivity. There is also the massive explosion resulting from the released energy. This energy acts in two ways. First, it creates a shock wave that destroys buildings and people within a certain radius. Second, a large fireball is formed by the intense heat; this fireball not only burns down buildings and the surrounding area, but also almost certainly generates a massive firestorm that can consume an even larger region through wind and convection.
Acute fatalities were approximately 70,000 in Hiroshima and 40,000 in Nagasaki. Within one year, the cumulative death toll had risen to roughly 140,000 in Hiroshima and 70,000 in Nagasaki. Additionally, many people later succumbed to injuries or radiation-induced illnesses in the years that followed.
Radioactivity
First, we need a few basics on radioactivity in general. If we say a material has one decay per second, it means that one nucleus of the material transforms each second. This decay can happen via alpha radiation (helium nuclei), beta radiation (electrons or positrons), or gamma radiation (high-energy photons). The half-life describes how long it takes for half of all nuclei in a sample to decay.
The unit of one decay event per second is the Becquerel (Bq). (Other units include the Curie (Ci), where $1 \text{ Ci} \approx 3.7 \times 10^{10} \text{ Bq}$, and the Rutherford (Rd), where $1 \text{ Rd} = 10^6 \text{ Bq} = 1 \text{ MBq}$.) These units measure radioactive activity, which is not as relevant by itself for health effects. What’s more important is the dose or exposure—this is how much radiation energy is absorbed or how it affects living tissue. Historically, units like Roentgen (R) and Gray (Gy) were used, but the most important for human health is the Sievert (Sv). The sievert applies weighting factors for alpha, beta, and gamma radiation to reflect their different impacts on the human body.
Typical background radiation levels are around 2–3 millisieverts (mSv) per year. Areas are often considered risky if they exceed tens of mSv per year. For acute exposures, about 0.5–1 Sv can lead to noticeable radiation sickness, 2–5 Sv may cause severe sickness, and doses above 5 Sv can be lethal to around half of those exposed.
Immediately after the bombings in 1945, survivors near ground zero were exposed to acute doses on the order of 1–6 Sv. In the months that followed, fallout and residual radiation contributed an additional dose of roughly 0.5–1 Sv. Over the subsequent years, as short-lived isotopes decayed, environmental dose rates in Hiroshima and Nagasaki eventually dropped to near-natural levels of about 0.2–0.3 mSv per year. Today, background radiation in these cities is similar to that in other urban areas—typically on the order of 1–2 mSv per year.
In Hiroshima, approximately 5–15% of all acute fatalities were directly caused by radiation sickness, while in the months after the bombing, most additional deaths were also attributable to radiation-induced illnesses. A similar pattern was seen in Nagasaki.
Blast Wave and Firestorm
The bombs were dropped from an altitude of around 9,400 m, but each was set to explode at roughly 600 m above the ground to maximize destructive effects. Of the approximately 20 kilotons of TNT equivalent, about 40–50 % went into the blast wave, 30–50 % into thermal radiation (intense heat and light), around 5 % into immediate nuclear radiation, and the remaining 5–10 % into residual radiation and the kinetic energy of bomb fragments.
The blast wave spread out spherically, causing buildings to collapse within a radius of about 1,500–2,000 m from ground zero. The extremely high temperatures ignited fires over roughly the same radius and triggered a firestorm similar to those caused by the incendiary attacks on Tokyo or Dresden—which, however, required thousands of conventional bombs rather than just a single device. Altogether, the blast wave and fireball accounted for about 80–90 % of the acute fatalities in the immediate aftermath.